Once you start getting into the simple lifestyle, sooner or later you're going to want an apron. I have my favorite bib-style H-back one that I usually wear. But I like having a couple extra aprons around too - guest aprons, you might say. My sister and her family usually visit for Thanksgiving. She loves it when I offer her an apron to wear too. It just makes her feel more "in the spirit", she says.

Once you have one for yourself, and maybe one or two for your guests, consider making an extra apron or two for
Tie One On Day. Started by EllynAnne Geisel, it's a way to put the "give" back in Thanksgiving: "Participation is simple: on the day before Thanksgiving, November 24th this year, pause in the preparation of your own meal, wrap a loaf of bread or other baked good (maybe my
One-Hour French Bread?) in an apron, tuck a prayer or note of encouragement in the pocket, and deliver the wrapped bundle to someone without your bounty - a neighbor, friend, or family member in need of physical or spiritual sustenance, a bit of recognition, or just a kind word."

Half-aprons make a good project for even beginning sewers. A quick and easy way to make a cute half-apron is to start with a pillowcase. Nice ones can usually be found at your local thrift store for $1 or less. I look for ones with some kind of different print or decoration around the opening end. That end makes the skirt of your apron - cut it between 16 and 20 inches long for a nice length (to make nice straight cuts, I measure and make a small mark on the edge where I want each cut. I fold the material over at the mark, align the sides and smooth everything flat, and then slip my scissors inside the fold to cut.) The middle cross-cuts make the waistband and ties. Cut two equally sized strips about 3" wide (I'm using a King case here, so I had enough material to cut three. I used one as a center piece and then trimmed half off the other two. Using all three would make ties long enough to wrap around and tie in front, for a different look) . Cut the sewn side seam off the skirt and band pieces. The closed end will make the two pockets, so don't cut the pillowcase seams on that piece.
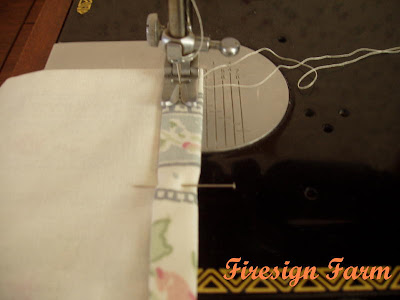
Fold the raw side edges of the skirt, where you just cut the pillowcase seam away, over twice to the wrong side, press, and sew down.

Make the pockets by cutting the top corner parts of the case into two equal squares (discard the center piece). Turn the corner inside-out, flatten, and stitch down the remaining two open sides of the square, leaving an inch or two left unstitched to be able to turn right-side out. Turn (you can clip the tips of the corners, then use a crochet hook to push the corners out to a nice point) and press flat, tucking the unsewn part evenly to the inside. Repeat on the other pocket.

Lay the skirt out flat and position the pockets an inch or two on either side of the center. Try different positions until you have something you like best - maybe with the pattern running perpendicular to the skirt's or putting the pockets on an angle. Just make sure that the unstitched part of the pocket edge isn't part of the top edge (top-stitch it to close it up if you just have to have it on the top part). Pin in place, then sew down three sides close to the edge of the pocket, leaving the top open. I like to spin the pocket around and run a second line of stitching just inside the first. You might like the look of using a contrasting color of thread too.

Join the ends of the waistband/ties. Press the seam edges open, and then fold over and press one long side. Find the center of the long piece, then lay the long piece right-side UP on your work surface with the folded side farther away from you (flip the piece over long-ways from the way it is in the above photo).
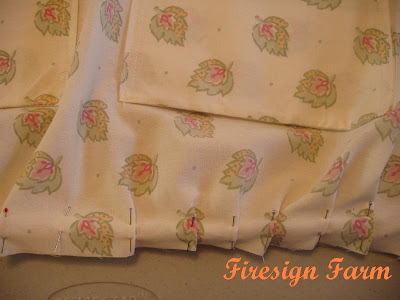
Lay the skirt, also right-side UP, on top of the long piece, matching centers of both pieces, the raw edges closest to you, and put a pin in the center. You can just pin the pieces together flat, but I like to gather or pleat the skirt a bit. If you want to gather yours, measure out equal distances either side of your center pin on the band piece, and pin the outside edges of the skirt there. Then pin in your pleats or gathers, matching what you do to one side on the other side. Sew skirt to band (I find it easiest to have the skirt part on top when sewing too, so that I can do any final adjustments to my pleats or gathers).

Fold the bottom edge of the waist ties up and press. Fold the top edge down, matching the folded edges together on the ties, and covering the line of stitching on the front of the skirt, and pin. Tuck the raw ends of the ties to the inside and pin them too, making a nice corner.

Top stitch the end of a tie, along the folded edges, across the top front of the skirt, along the folded edge of the other tie and across the end. A final quick pressing and you're done!
 Once you have one for yourself, and maybe one or two for your guests, consider making an extra apron or two for Tie One On Day. Started by EllynAnne Geisel, it's a way to put the "give" back in Thanksgiving: "Participation is simple: on the day before Thanksgiving, November 24th this year, pause in the preparation of your own meal, wrap a loaf of bread or other baked good (maybe my One-Hour French Bread?) in an apron, tuck a prayer or note of encouragement in the pocket, and deliver the wrapped bundle to someone without your bounty - a neighbor, friend, or family member in need of physical or spiritual sustenance, a bit of recognition, or just a kind word."
 Half-aprons make a good project for even beginning sewers. A quick and easy way to make a cute half-apron is to start with a pillowcase. Nice ones can usually be found at your local thrift store for $1 or less. I look for ones with some kind of different print or decoration around the opening end. That end makes the skirt of your apron - cut it between 16 and 20 inches long for a nice length (to make nice straight cuts, I measure and make a small mark on the edge where I want each cut. I fold the material over at the mark, align the sides and smooth everything flat, and then slip my scissors inside the fold to cut.) The middle cross-cuts make the waistband and ties. Cut two equally sized strips about 3" wide (I'm using a King case here, so I had enough material to cut three. I used one as a center piece and then trimmed half off the other two. Using all three would make ties long enough to wrap around and tie in front, for a different look) . Cut the sewn side seam off the skirt and band pieces. The closed end will make the two pockets, so don't cut the pillowcase seams on that piece.
 Fold the raw side edges of the skirt, where you just cut the pillowcase seam away, over twice to the wrong side, press, and sew down.
 Make the pockets by cutting the top corner parts of the case into two equal squares (discard the center piece). Turn the corner inside-out, flatten, and stitch down the remaining two open sides of the square, leaving an inch or two left unstitched to be able to turn right-side out. Turn (you can clip the tips of the corners, then use a crochet hook to push the corners out to a nice point) and press flat, tucking the unsewn part evenly to the inside. Repeat on the other pocket.
 Lay the skirt out flat and position the pockets an inch or two on either side of the center. Try different positions until you have something you like best - maybe with the pattern running perpendicular to the skirt's or putting the pockets on an angle. Just make sure that the unstitched part of the pocket edge isn't part of the top edge (top-stitch it to close it up if you just have to have it on the top part). Pin in place, then sew down three sides close to the edge of the pocket, leaving the top open. I like to spin the pocket around and run a second line of stitching just inside the first. You might like the look of using a contrasting color of thread too.
 Join the ends of the waistband/ties. Press the seam edges open, and then fold over and press one long side. Find the center of the long piece, then lay the long piece right-side UP on your work surface with the folded side farther away from you (flip the piece over long-ways from the way it is in the above photo).
 Lay the skirt, also right-side UP, on top of the long piece, matching centers of both pieces, the raw edges closest to you, and put a pin in the center. You can just pin the pieces together flat, but I like to gather or pleat the skirt a bit. If you want to gather yours, measure out equal distances either side of your center pin on the band piece, and pin the outside edges of the skirt there. Then pin in your pleats or gathers, matching what you do to one side on the other side. Sew skirt to band (I find it easiest to have the skirt part on top when sewing too, so that I can do any final adjustments to my pleats or gathers).
 Fold the bottom edge of the waist ties up and press. Fold the top edge down, matching the folded edges together on the ties, and covering the line of stitching on the front of the skirt, and pin. Tuck the raw ends of the ties to the inside and pin them too, making a nice corner.
 Top stitch the end of a tie, along the folded edges, across the top front of the skirt, along the folded edge of the other tie and across the end. A final quick pressing and you're done!


1 comment:
My grandmother(BORN 1898), always wore an apron. she told me to use my index finger to measure how low the pockets should go. You put your knuckle at your waist, and put the top of the pocket at the end of your finger. This reminded me of her.
Post a Comment