Wednesday, July 13, 2011

Bending Down the Garlic

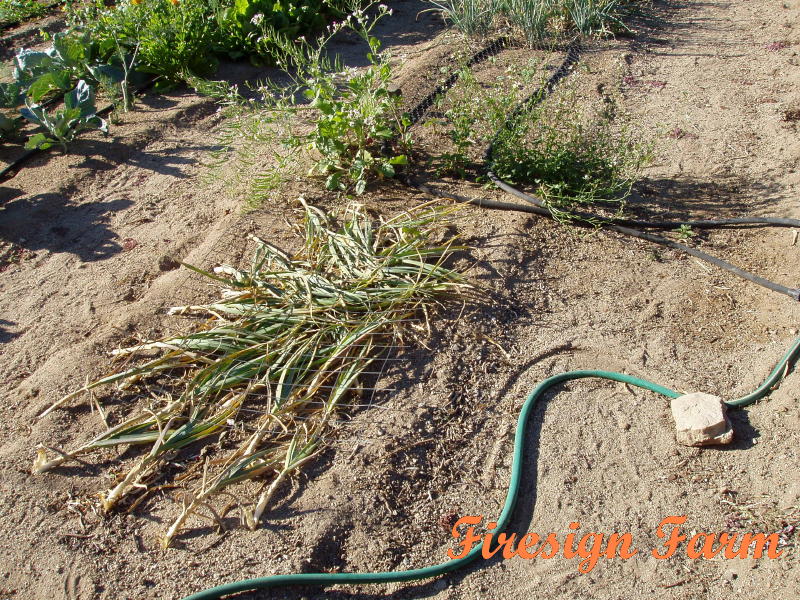
I'm having some successes, and some failures out in the garden. That's usually the case around here, too. The garlic is looking good. The tips of the leaves were starting to dry up. When the top one-quarter had dried, a couple of days ago, I pulled the soaker hoses off and bent the tops over. Sometimes they'll just fall over on their own, but if they don't by the time 1/4 to 1/3 of the leaf tips has browned I do it for them. If you wait too long, until most of the leaves have dried, they'll be too dry and rattley to form a nice snug wrapping layer around the bulb when cured, and then they won't last very well.

Bending them over now tells the plant to pull the last of the energy out of the fading green leaves and store it in the bulb. Removing the water hose also tells them it's time to concentrate and shut down for the season. I'll give them a couple more days of drying out in the ground, letting the necks shrink a bit. And then dig them up before the leaves get too dry and brittle to braid.

I've been so busy lately. I do so enjoy writing, but so many other things just had to be done first. I was installed as President of my local Soroptimist Club three weeks ago, and have been trying to get organized - committees appointed, and finding the people to chair them; creating the agenda and supporting materials for my first Board of Directors' meeting, and then today for my first Club meeting; brushing up on my Parliamentary procedures; and even inducting a couple of new members. Add in one of our major fundraisers - taking my turn in our tasting kit booth for an International Chili Cookoff, plus the training session as a volunteer for the Lake Tahoe Shakespeare Festival . . . ahh, but enough whining - I do love everything that I'm a part of here in my community.

Monday, June 6, 2011

More Garden Preparation

Last week still saw night temperatures below freezing, and even a couple of days with snowflakes swirling about. The plants I started inside spend the days out on the deck, and are now more than ready to plant. However, despite what the calendar says, I'm going to hold off a bit longer. Outside, the soil is still too cold for tender plants and warm season seeds.

The cold weather plants are doing fine - although they're growing slowly in the cold winds, they are developing strong healthy roots in the wet soil that will better sustain them when our hot and dry summer finally does arrive. The emergency measures we've had to take to deal with neighboring wildlife - surrounding the garden with a high deer-proof fence and covering the chicken pen - has allowed my plants to grow without as much animal damage. I might even get to harvest some peas - since the guineas won't be flying in to eat the blossoms!

Yesterday, I found the time to get out there to prepare a third 50' garden bed. Since this one is going to hold "roots" crops this year, I wanted to make sure the soil was deep and loose, tossing any rocks I found. These three lower beds had been reconfigured last season, so it didn't take me too long to turn the damp sandy soil, and then work it into a 3' wide level planting terrace across the slope.

I had just enough time to get it all raked out smooth and level when the first raindrops started. I rushed to get laundry off the line and tools put away. Everything got a good soaking through the night - we went to sleep to the sound of raindrops on the windows, and even the occasional rumble of thunder.

Friday, May 27, 2011

Bobcat Prevention - Quick Chicken Pergola

A couple of months ago, we lost one of our chickens. And the bobcat sightings have since still been occurring from time to time around our neighborhood. Sometimes it's just a lone adult, but also a half-grown young one is around too. Since the female had to get pregnant somehow, it's probably safe to say there are now at least three in the area.

Yesterday afternoon, I was out working in the yard when a neighbor driving by stopped to talk. The day before, they'd come home to complete carnage inside their chicken coop. They have cameras on the outside of their house, and when they ran the film back to around noon, they could see an adult bobcat bounding across the yard and jumping the 6-foot chicken pen fence easily. After swatting down a couple of the chickens in the yard, it then followed where the rest had fled into the coop, killing 20 of their 25 birds.

Yesterday evening, Aries was out in front of our house when he heard and saw a couple of magpies raising a ruckus coming down our street. They were diving and squawking at an adult bobcat as it walked down the middle of the road. When it came even with the front of our house, he tossed a couple of rocks at it. It headed up the hill into the sagebrush, magpies still squawking and diving overhead.

When Aries got home from work today, the magpies were squawking in the neighbors' tree. He walked down to check, then came back to get me and the camera. The young bobcat was sitting up there IN the magpies' nest, ignoring the squawking magpies hopping about overhead, calmly looking down at us. Momma was probably somewhere nearby.

Our neighbor called the Sheriff's Office, asking if there was anything they could do. Dispatch told her it was a holiday weekend; they had neither time nor personnel to deal with a bobcat up a tree. Neighbor called the state Division of Wildlife and they too would do nothing. Furthermore, neither could she. Despite the livestock predation, if she wanted to shoot or trap a bobcat, she'd first need to apply for a permit, 'else face poaching charges.

We left the cat up the tree and walked home. After hearing about how easily bobcats can jump 6-foot fences, that they're active even during mid-day, and that they'll kill for sport instead of just hunger, Aries decided maybe putting a top on our chicken pen might be a good idea. We still had about 3 hours of daylight, lots of wood in the scrap pile, and bits and pieces of wire fencing. It was kind of like erecting a makeshift pergola over the top of the pen. We had some really long 2x4's salvaged from when we re-built the deck a couple of years ago. Using a 1½" drill bit, Aries cut holes in the ends of some of those to fit on top of the t-posts on either side of the pen. More long pieces were then laid crossways over the top of those, with an upright center post for extra support.

The bits and pieces of wire were then patchworked over that. Lastly, we tied everything together on top and to the sides. Amazingly, we were finished by sunset. It's not pretty. Some of the boards we used were really weathered and some were warped and twisted. We'll probably have to re-work everything later on in the year to make sure it's strong enough to withstand the weight of next winter's snows. The guineas and our four half-feral chickens aren't going to like not being able to fly out, either. But I feel a bit better knowing our flock is perhaps a bit safer.

Sunday, May 22, 2011

Ants Love Electricity?

I've heard ants are attracted to electricity, but never seen any evidence until today. I started my tender vegetable seedlings inside my spare room a couple of months ago. Once they had germinated, I set them up under lights plugged into a timer. Today, I moved the plants outside for a bit, hardening them off in preparation for setting out after Memorial Day.

Since the lights were no longer needed, I started breaking everything down to store for another year. When I unplugged the timer from the wall plug, tiny little piss-ants came just pouring out of it. I ran to get that timer outside, ants swarming over my hand (and biting, too! nasty little creatures!). I set it out in the middle of the yard on an upturned bucket, and went back in to take a second look at the outlet. There were a few ants wandering around the plug, but it looked like the majority of them had been inside the timer. When Aries got home from work, he took the outlet faceplate off and pulled the outlets out of the junction box a bit (he's a facilities engineer at work, so knows about safely working around electricity).

That wall is an outside cinder block wall, so there are hollow spaces inside, built on a cement slab floor. Checking with a flashlight, he could see some more ants at the back of the box, using the wiring for a highway, probably coming up inside the wall from the dirt outside through a crack in the mortar. We vacuumed up all we could see (but they didn't seem to have come inside beyond the plug and the timer connected to it), and then he sprinkled a bit of boric acid inside the box. He left everything apart so we can check it again tomorrow.

Outside, the timer rattled inside when I shook it, and the ants still kept pouring out. Knocking it against my hand over the white bottom of the bucket, I shook out a bunch of pale little ant eggs. They'd turned that timer into a nursery! I shook it and rapped it until it seems like it's empty, but it's going to stay outside for a while anyway. Yuck! I'm just amazed that the timer kept turning - it kept perfect time. (Note: Aries took the timer apart and cleaned it out completely - now I can put it away without getting the shudders.)

Thursday, May 19, 2011

Custom Solar Light Brackets

Our home is just rural enough to be beyond the sidewalks, streetlights and sewer system; just urban enough that the parking lot lights of the businesses along the highway two blocks away light up the night sky. Unfortunately, all that eye-level light pollution makes it doubly hard around here to see the ground underfoot after dark.

After 20-some years of marriage, Aries and I have a finely-tuned poultry-care system. He's an early riser, and so are the chickens - he makes sure they have fresh water and food, then opens up the coop each morning. I take the evening shift - making sure everyone is in for the night, then closing up pen, coop, and nest boxes.

Oft-times, depending on my schedule, it's full-on dark before I head down to put the chickens to bed. Our lot is on a bit of a slope. The house and garage are at the top, with everything to the east downhill from that. There are steps from the deck and patio down, a sloping dirt ramp over on the garage end of the lot. Maybe it's because I'm getting older, maybe it's because there are more and more lights shining above the neighbors' house. But I've become much more nervous and cautious going down either flight of dark steps. I thought about painting a white stripe on the edge of each step, but didn't like the way that would look, nor would it hold up to winter-time snow shoveling. The same arguments worked against attaching a silver metal edging. Adding more light at my feet, to counteract the glare in my eyes, seemed the best solution.

So I'd been shopping for solar lights. I found a four-pack of medium-brightness ones I liked. As with most all I saw, they're designed as landscape lighting, with a pointy piece to stick into the ground. But I wanted them to illuminate my hardscape. I figured it would be no problem to find brackets to attach them to the edge of the steps. And that's where I was wrong. Despite checking all my local home stores, and even searching on-line, I couldn't find a thing. Luckily, I have a husband with a garage full of tools, plus a stash of wood scrap that more than equals my fabric stash. I can sketch out an idea, show him where I want it to go, and he'll make something that both works and looks nice. So now we have solar lights with custom brackets lighting up the steps down from both the deck and the patio ends of the house.

Using a bit of wood for a base, he drilled a hole part-way through to hold the light post. The post diameters were a weird metric size - too big for a 7/8" bit, but smaller than one inch. Rather than chisel out the extra from the smaller hole, he used the 1-inch bit and then shimmed the post with a wrapping of black electrical tape around the bottom. For the floating deck stairs, the brackets are attached to the edges of two of the wooden steps with glue and screws. On the patio stairs, the square wooden blocks are just set on either side of the stairs on the bricks that make up the sides. I set a smaller brick atop each wood block, behind the light post, to make sure the wind can't blow them over. They're great! The light of the full moon also has everything lit up lately, so I'm patiently waiting for the dark of the moon to see just how much light they provide. But I do feel so much more relaxed and secure going down either flight of steps in the dark now.

Tuesday, May 17, 2011

Thinning and Transplanting

A series of cold fronts coming through dropped our low night temperatures into the mid 20'sF. While once again frustrating my dreams of a bountiful fruit crop this year, it is completely normal for high-desert weather in mid-May (and sometimes, even for mid-June, perish the thought). What little bit - lettuces, spinach, peas, and alliums - I have growing out in the vegetable garden seems to have come through ok so far.

I haven't set out my cole crops - broccoli, cauliflower, cabbages, choi, radicchio, and tuscan kale - but plan to do so within the next week. Most catalogs say to plant very early for a Spring harvest; again in early August for a Fall harvest. I've never had any luck with that. I just plant everything once and hope to stretch the harvest season until October through varying the length of growth periods on some things (like cabbage - I plant both an early and a late variety), and cut-and-come-again harvests on others (like the kale and broccoli).

I did some thinning and transplanting of the cole seedlings a couple of weeks ago, writing about that here, on the SGF Co-op blog. Since then, I've been hardening them off - moving them out to the table on the deck daily, bringing them back in to the kitchen counter at night. I now have some sturdy little plants with separate, compact root balls to set out.

Yesterday, I thinned and transplanted my warm weather seedlings. Even though the night before had been cold, the temperature warmed up to a nice 60F. Overcast and still, with no bright sun or drying winds to crispify the roots, the operation took place outside on a big salvaged cable spool I use as a potting table. Even so, I tried to move quickly whenever I had the roots of any tiny seedling exposed. Some looked a bit poorly and limp as I moved them back inside, under the lights (my temporary setup: a pair of ladderback chairs, a plank, and lights suspended by a couple of curtain rods), but all had perked right up by this morning.

Some of my seeds never did germinate. I ended up shopping for a few plants this weekend - more bell peppers, plus some eggplants, Anaheim chiles, one Habanero chile, and one Sweet 100 tomato. To save money when I buy plants, I look for the little individual pots with more than one plant growing in them, and then separate them out myself, same as I do with my own seedlings. I'll give everything another week or so under the lights, to give the roots time to re-establish. Another week or two of gradually increasing hardening off out on the deck, and everything should be ready to set out in early June.

Tuesday, April 5, 2011

Varieties for Northern Nevada Gardens

I got my indoor seeds planted today. I've found eight to ten weeks is long enough to get everything up and growing and hardened off, ready to plant. Since I won't plant any of them outside until after Memorial Day, today was a fine time to get them started. They won't be as big as the plants you can buy in the garden shops in May. But I think my smaller plants undergo less transplant shock, and do catch up quickly once the warm weather gets here. More about the process here.

Those of you following along at home, start saving your eggshells, too. I just keep mine in an open jar under the kitchen counter. They dry out, so don't smell or attract ants. When the jar gets full, I use a potato masher to crush them down. When it's time to set my tomatoes, peppers, chiles, and eggplants out in the garden, I add some eggshell (calcium) and Epsom salts (magnesium) to the planting hole to prevent blossom end rot. It's a good idea to pick up some Wall-o-Waters if you see them in the store, too. I reuse the same ones year after year. I put them around my plants when I set them out, and leave them on until July. They both keep the plants warmer at night and provide protection from our notorious Washoe Zephyr.

Most years, we can count on around a 100-day growing season for our tender crops. Pass up those Brandywine tomatoes, and go for the Early Girls if like eating home-grown ripe tomatoes. Here's what I started today - varieties I've found that usually will produce a pretty good harvest in our high-desert climate. Many of these can be found in the seed racks at Wal-Mart or any of the grocery stores. This is enough for the two of us to eat fresh, put by for the winter, and still have some extras to give away:

1 Early Girl tomato - the most reliable, fresh-eatin' tomato
1 Sweet 100 tomato - for snacking on, right there next to the plant
6 CC (for Carson City) Paste tomatoes; to can, slices to dry, plus they'll also store until after New Year's - I started with an Amish Paste tomato 25 years ago. I kept saving seeds from the biggest, earliest couple of tomatoes each year, and now have my own "heirloom" that reliably produces big, early, bunches of tomatoes. I don't bother with the fermenting-seeds-in-water bit everyone tells you to do - I just cut the fruit open, squoosh the seedy gel out with my finger, and wipe it onto a piece of paper. When dry, I fold up the paper and store it in an envelope in my seed box. When it's time to plant, I just scratch the seeds off the paper and stick 'em in the dirt.

6 CC Chile peppers - same story - I started with an Anaheim/California green chile years ago, and saved the seeds from the biggest, earliest couple of fruits each year
6 California Wonder bell peppers - still working on getting a good, early bell pepper. This is an heirloom so has some good possibilities
6 Jalapeno peppers - up from my usual two plants. The jalapeno jelly I made last year is soooo good, I want to make sure I have enough plants to make a batch or even two this year. If I end up with a bumper crop, it's easy to put together a smoker to make chipotles - maybe I'll try canning a batch in adobo.
6 Ancho chile peppers - the additional chile for this year. Every year, I grow and dry or can enough of one different chile - cayenne, paprika, relleno, pimiento, etc. - to last for the next 3-4 years. I just broke open one of last Ancho I grew, strung up in a ristra hanging in my kitchen, and planted those seeds. They should still be viable.
1 Habanero pepper - I usually end up buying a plant at the store. If I want to grow my own, I should probably start it in January instead of waiting until now. One plant will usually produce enough to make a batch of my favorite hot sauce each year.

2 Clemson Spineless okra - yes, you can grow okra here. And why deal with spines if you don't have to? It's an heirloom variety, but I've never managed to save viable seeds so I buy a packet every few years.
3 Black Beauty eggplant - I like them better than the Japanese type, plus they'll last in storage 'til the first of the year. Same as the okra, it's an heirloom variety, but I've never managed to save viable seeds.
2 basil - enough to eat fresh, dry some, plus freeze a few batches of pesto, too
2 green tomatillos - last year, I just picked out the biggest fresh tomatillo I could find in the grocery store, and did the same squoosh-the-seeds-onto-paper that I do for tomatoes. I got a nice harvest of good-sized tomatillos, and saved the seeds from the biggest, earliest ones to plant this year.

I also started six-packs of early Golden Acre cabbage, late Dutch Ballhead cabbage, broccoli, cauliflower, raddichio, Joi Choi, Tuscan kale, and both orange and yellow calendulas, plus a couple chard, red kale, and blue kale plants. But those are all cold-hardy veggies, so just about any variety of those plants will do ok here. All of those will get set out the end of May too, to grow through the summer for a fall harvest.
Monday, April 4, 2011

Garden Remodel, Still in Progress

The plan for today was to get my seeds started inside. But when Aries' planned outing got canceled, I changed my plans in order to take advantage of the nice weather, superior muscles and horsepower now available. I got him to help me finish the garden reconfiguration.

I've been working on this project for a year - starting with moving the chicken coop, so we could move the garden fence, and re-working the lower two squarish beds into three long ones. I'd moved the raspberry patch last week, so had only to dig up the little patch of baby leeks, bunching, and walking onions. While I did that, Aries got the big rototiller fueled up and running, and brought it down to the garden. Luckily, a friend stopped by to visit him just then, so it gave me some time (ah, the dynamics of two fire signs working together - there can be sparks, but we do get things done) to get some stakes and string laid out to show him what should be garden bed and what should be path.

Our entire property drops down towards the east. He had to really work to keep that big tiller moving across the slope when it wanted to swing downhill, but he did pretty good keeping it lined up reasonably straight. Once tilled, he started hauling wheelbarrow loads of compost down from the bin up by the garage (he thinks it's easier to move the spent plants and chicken manure up, and the compost down, than moving the chipper-shredder very far from the garage). I spread the compost evenly over each bed, and then he ran through each one again. I'm still going to have to do some hand-digging along the edges of each bed, and a lot of raking to get them all into level terraces. But it's looking good.

Sunday, April 3, 2011

Seed Starter Mix

It's time to start tender seedlings inside, to be set out in the garden after Memorial Day. But I was out of my seed starter mix, so today I made up a batch. Regular potting soil is too coarse, and doesn't hold enough water to get seedlings off to a good start. Curious, I looked at the tiny bags of seed starter mix in my local home improvement store. Not only would buying enough for my needs be prohibitively expensive, but I really don't think using something that, in reading the small print on the back, cautions that it's important to wear gloves while using this product, keep it away from children, and write to them to find out more about the metals (metal??) it contains. That just sounds chemical-laden to me. I'll continue to mix up my own, thank you.


Seed Starter Mix

3 parts compost
3 parts sphagnum peat moss (or coir fiber)
1 part vermiculite (or perlite)
a dusting of fertilizer booster blend (equal parts bonemeal, bloodmeal, & greensand)

I bought a bale of compressed peat moss at Wal-Mart, and big bag of vermiculite at Home Depot. Both are enough to last me for another 5-6 years of planting seasons. The compost and fertilizer blend I already had.

My compost is completely cooked, but still pretty coarse, so I had Aries run me a bin-ful through the chipper/shredder. Better, but still too coarse for little broccoli seeds. But once I sifted everything though a riddle, I had a wonderfully fluffy, fine-textured mix. It was easy to mix everything together with a trowel.

It's important to get the mix evenly damp before planting. The moss holds water well, but once it dries out, it's hard to get the moss re-hydrated again without disturbing the seeds. Wheeling it over to the faucet, I ran enough water into the wheelbarrow to make a soupy mess, and left it for a few minutes. When I came back, the moss had soaked up everything but there were still dry spots underneath. I kept adding water, stirring with a short-handled shovel, and waiting a bit, until everything was evenly damp.

Using compost, I probably won't have any pathogens or molds in this mix, but just to be on the safe side I solar-sterilized it. An old salvaged storm window was the perfect size to fit over the wheelbarrow. Weighting the glass down snug, with an old rug and a wadded-up feed bag tucked into the spaces top and bottom, I left the whole thing sitting in the sun all afternoon. Despite the somewhat cool temperatures today, the glass started steaming up almost immediately. This evening, I'll fill up my seed starter bin and bring it into the house so it doesn't freeze overnight. And tomorrow, I can plant my seeds!

Saturday, April 2, 2011

Planting Day for Cold-Tolerant Seeds

The earliest daffodils are blooming, and now today, the Shiro plum tree. A couple of blooms have opened on the apricot. Buds are swelling on the rest of the plums, and leaves just starting to show on the lilacs and the maple tree. It's starting to look like Spring!

Yesterday evening, I finished digging and shaping two of my garden beds, and laid out the soaker hoses. So today was early season planting day. The onion plants were still dormant, down in the cool cellar. It's a bit damp down there, and a few of the tops had a bit of fluffy, grey mold on the tips. So, using my kitchen shears, I clipped about half an inch from the top of each bunch. Once outside in the wind and the sun, they should be fine.

With six garden beds to play with now, I've had to do some figuring and planning of how I want to divide up my plantings, and how my rotation will work. One long bed will now be the Allium bed, with a couple of little bits for the earliest greens harvests interspersed. It gets a dual soaker hose setup. My softneck garlic, from bulbs harvested last July then planted last fall, is already up about four inches, and green tips of the shallots are just starting to poke up out of the ground. I had scattered some spinach and arugula seeds in a block between those two last fall. They germinated in January but then shriveled in the dry eight weeks that followed. Ah well, sometimes that works, and sometimes it doesn't. So today I seeded some more arugula (my seeds, harvested last summer) in half of that area and some Champion and Salad Red radishes in the other half.

On the other end of the bed, I set out one bunch of Copra onion plants, plus a mixed bunch of Red Zeppelin, Ringmaster, and Walla Walla plants. I dug a couple of bunches of baby leeks from my allium nursery bed, and set each one into a hole the depth of my trowel (taking the time to hand-dig the entire bed this past week makes it so easy to plant everything today). In the last little patch of that bed, I scattered some Bloomsdale Long-Standing spinach seeds, harvested from last year's plants.

The second long bed will be a Peas and Greens bed - also with dual soaker hoses. I made three pea trellises, pieces of wire fencing attached with twist ties to t-posts pounded into the center of the bed. Despite what they say on the seed packets, I don't think you can plant peas too thickly. I dig a 3" wide trench on either side of the trellis and then scatter in the seeds about half an inch apart. I planted Sugar Snap peas around one trellis, Lincoln English peas around another and, for the Chinese pea pods, Melting Sugar on one side and Oregon Sugar on the other. All the peas are heirloom open-pollinated varieties, so I can save seeds for future plantings.

I've found that planting lettuces on the outside edges of the pea plantings works well. As the weather gets warmer, the growing peas provide shade for the lettuces, and the shade from the lettuces keeps the pea roots cooler, prolonging the harvests of both crops. I planted Romaine, Four Seasons, Buttercrunch, and a Gourmet mix of lettuces (also all open-pollinated) on either side of the Snap and Chinese pea plantings. I'm going to start some Tuscan kale plants inside to set out alongside the English peas.

I seeded some Swiss Chard and the last of my Joi Choi seeds in one patch between two trellises. I need to order some more Joi Choi seeds. It's a hybrid but it's the only bok choi I've found that can take the heat of our high-desert summer without bolting, so worth searching out (I get it from Jung Seeds). The rest of that bed I left open for cauliflower, cabbage, and broccoli transplants.

Thursday, March 31, 2011

Hand-Digging New Garden Beds

I started a garden realignment last year, switching two "S" shaped garden beds over to three long straight ones. Aries ran the rototiller down the new beds last year in time to get them planted. But I don't like the job the rototiller does. It's good for breaking up new ground, but doesn't really go as deep as I like or sort out the rocks. So the past week, I've been out there diligently hand-digging.

Each bed is 50' long, so I can use standard soaker hoses, and 3' wide. I did one-third of one bed last fall, for the garlic and shallots. Each bed gets four wheelbarrow-fuls of compost, spread out to cover the entire surface with about an inch. I use an equal-parts mix of bonemeal, bloodmeal, and greensand as an organic booster fertilizer, so sprinkle a light dusting of that over the compost, and then start digging. It takes four passes down the length of the bed with a shovel to turn and mix everything in, making sure the edges of the beds go down as deep as the centers. Some of the beds were where the old garden beds had been, so it was easy to sink the shovel in past the depth of the blade. But other parts used to be the paths, untouched since the whole area was a horse corral. When I hit one of those parts, I have to stand on the shovel and rock it back and forth and side to side, until I slowly work it down into the hard-packed dirt. Every once in a while, I can tell I've hit a rock, so work and worry it about until I can get it to the surface to toss it to the side.

Once everything is mixed and fluffed up, I then go to work with the rake. When I'm finished, I have a level, wide, raised garden bed making a terrace across the slight slope of our property. The three beds that will have smaller, closely-spaced plants get two soaker hoses; the other three for the bigger plants will get only one down the center. I'm about ready to get Aries out there with the rototiller to re-shape the remaining two "s" beds (on the right) into three more long ones, so will have plenty of digging yet to do. Once the beds are formed, they never again get walked on, so garden preparation in subsequent years will be a lot easier.

Monday, March 28, 2011

Uh Oh, Who's Missing?

There were feathers wafting about in front of the house today - not a good sign. I did a chicken roll call and Flopsy, one of our Buff Orpingtons, was missing. Further investigation turned up a half-eaten chicken carcass over in the neighbor's yard. From the evidence, the most likely suspect is the bobcat that's been seen here and there around the neighborhood lately. Darn! From the looks of our egg take today, it appears she was the one laying the really big round egg (bottom left, below) each day, too.

We usually let the chickens have the run of the whole yard during the winter. They're my organic, integrated pest control patrol. They're pretty good about staying within the fence, for the most part, but I had noticed a couple them were venturing outside the fence more and more often lately. It looks like it's time to confine them to their pen. It was about time to do so anyway - once the growing season sets in, their incessant scratching and dust bathing gets too destructive. They never like it, but now, it's for their own protection too.

I think I might have to start keeping my camera close by, especially the couple of hours just after sunrise and just before sunset. I'd love to get a photo of that cat. I just hope he stays outside the fence.

Friday, March 25, 2011

The Zen of Snow Shoveling

The couple inches of snow we woke up to yesterday had pretty much melted by noon. A quick afternoon flurry while I was at work dropped a couple more inches of wet, sloppy snow, but it was gone by evening. And then, at nightfall, the real storm moved in. We woke up this morning to another six inches of snow, sunshine, and freezing temperatures.

Aries had time to clear a path across the deck before his work carpool showed up. I figured quite a bit of it would melt again, but I really don't mind shoveling snow. Plus, snow reflects the sunlight back, but anything cleared down to dark dirt absorbs the heat. This snow might be here a couple of days, but cleared paths dry out quickly, making going about on chores later a lot easier, with less chance of slipping, and helps keep the house cleaner too.

So, with my Ipod in my back pocket (gotta have music), I headed out later in the morning to clear a few paths. By then, the snow had packed itself down by half, but was also twice as heavy. It's a good arm and core workout - keeps me in shape for the garden digging I hope to be doing soon. First path, down to the chicken coop, with a short side path to the front of the feed shed. Aries opens up the coop in the mornings. A couple of the hens had crossed the snow, and were hanging out inside the shed. One had even laid an egg on the floor. But most of the girls, and the guineas, don't really like getting their feet wet. They were all still holed up in the coop. As soon as I had the area around the feeder and their door cleared though, they were all ready to come out into the sunshine.

Aries had given them fresh water earlier, but it had frozen into slush since then. I tossed that, and fetched a fresh bucket of water from the house. I then continued my shoveling. I like to make a path back up to the back door of the house, with a side spur into the dog run. It gives the chickens more room to walk about, and they like hanging out inside the south-facing doghouse there.

From the back door, I shoveled past the garage to the woodpile. The woodbox inside had plenty for today, but having a clean, dry path will make it easier for Aries to refill it for me when he gets home from work. One more path, connecting back door to kitchen door, and I'm finished out back (in mid-winter, when the snow is deeper and won't be melting anytime soon, I also do one more over to the cellar and shovel the door).

Out front, I do one from front door out to the mailbox - even though I wasn't expecting any visitors today, I think it's just good manners to provide non-slippery access from the street to the house. I had afternoon errands planned, and would need my car, so did a quick swoop 'round it, and then got the broom to clean it off. Another swoop 'round, to clean all the snow I'd just slid from car to ground, so I can get into it later without soaking my shoes. And then one last little bit more: though there wasn't enough snow to need to shovel the driveway, I do have to clear the berm the snowplow left, at least wide enough to back my car through. That's the hardest part, too. Plow berms are always heavy, frozen chunks. Ahh - an hour's work, a couple hundred feet of paths - I'd say it's time for a cup of cocoa.

Wednesday, March 23, 2011

It's Spring?

The only spot of color outside my windows are the finches sheltering underneath the snow on the bare branches of the lilac. But I have faith that Spring weather will come eventually. So it's time to start thinking about the garden.

My onion order arrived last week, but I haven't even been able to get out to the garden yet. Depending on which day it is in our current weather cycle of the past three weeks, it's either too wet or the ground is frozen or it's buried beneath a couple inches of snow once again. But the info sheet said the onion plants will stay dormant for at least 3 more weeks if kept cool and dry, so I've put them down in the cellar for now.

There are lots of gardening things to get started on now, even when I can't get outside. For my fellow northern Nevada gardeners, I'll try to get back on a regular posting schedule so you can all follow along. Plus, I've been taking photos all along, so might do some back posts so I can look back to see what was happening when. Look on the bright side - the longer it keeps snowing, the better the chance the fruit trees will hold off blooming long enough to get some fruit later this summer.

Monday, February 14, 2011

Perennial Herbs

I finished the herb garden cleanup today. The barometer falling, a chill wind had come up overnight, harbinger of the storm headed our way. But with the combination of hard work, weak sun, and protective house walls on the north and west I soon worked up a sweat.

That area was once filled with massive spreading juniper bushes. I'd never really liked them there. The living room picture window looks out over that area, so I wanted something prettier. Plus, junipers can go up just like gasoline in a wildfire situation. Not a good landscaping choice right next to the house in our arid, fire-prone location. When we remodeled the deck and walkway on that side of the house, I talked Aries into pulling out the junipers too.

The only plant I left in that bed was a roof-high lilac bush. In hindsight, it's the wrong plant in the wrong place. For one, it was planted too close to the house - I have to get behind it and clip off any branches that are growing into the eaves. And two, it's the type better used in a hedge, not as a specimen plant. But I love the shade and privacy it provides the bathroom window behind it, especially on hot summer nights. So, I diligently prune the suckers early each spring, when I can work around it before the rest of the plants come back underneath.

Sunday, February 13, 2011

Herb Garden Cleanup

Snow is in the forecast for later this week, but today was clear, warm, and still. I decided to do a bit of spring cleaning in the herb garden outside my kitchen door.

I gathered the necessary hand tools, fetched the wheelbarrow, set the solar-powered radio in the sun, and got to work. Spent stalks of last fall's flowers, left for the bees' last foraging, were clipped and tossed. A couple of the hens have been hopping the little picket fence. Their scratching (ewww, it smells like the cat's been in here too) had turned the once-level ground into little pits and mounds. They'd also scattered the rocks filling the drainage trench beneath the eaves across half the bed. Working with a leaf rake, I got most of the rocks and dirt mounds back in place, debris destined for the compost pile into the wheelbarrow.

There were some pleasant surprises - a green-shelled egg (one of our Amerucana/Brown Leghorn cross-breed hens has been here - it sank and laid down when submerged in water, so I know it was fresh, but had a crack in one side - probably froze overnight - so I tossed it), sprouting tips of the earliest daffodils starting to emerge, and beneath the lilac, a bright yellow bud of the first crocus.

The hours passed with the simple joy of getting my hands back in the dirt. The shadows lengthened. I moved the radio a couple of times, chasing the patches of sunlight, until I finally had to go find the power cord and set it up on a bucket near the electrical outlet. I'd finished with the herb garden, and started cutting suckers out of the lilac by the time Aries came home from work. Time to put my tools away and empty the wheelbarrow so he could use it to bring in firewood. In the last bit of light, I made a couple of trips down below the vegetable garden, fetching up big pieces of wire fencing to lay down over everything. After all that work, I had to make sure the hens (or cat) couldn't scratch it all up again.

Saturday, February 12, 2011

My Onion Order

Onions end up in just about everything I cook for dinner, quite often in breakfasts too, and many of my canning recipes. Despite numerous attempts, I've never been able to grow decent onions from seed. They'll sprout but just never have done very well for me, if they survive until the setting-out stage at all. So then I'd end up buying a couple of the little bags of onion sets, the miniature bulbs you plant in the early spring to get bigger bulbs later in the season. Those work good if you mainly want scallions or small onions to use fresh - they usually aren't the storage type. My goal in growing onions is to have enough for all my end-of-season canning, plus more to cure and store until I can start harvesting the next summer's crop. Buying onion plants works best for me.

I lost quite a few of last summer's storage onion plants midsummer, to Bambi, so this year I had to start buying my cooking onions in January. I am digging wintered-over leeks now, and still have plenty of shallots though. And soon, I should be able to harvest some spring onions. My walking onions are starting to sprout anew, and the bunching onions should start coming back before too much longer too. I have some onion seeds that are only a year old, so might try starting my own once more, but taking my past attempts into consideration I'm not counting on them.

Today, I ordered a couple bunches of onion plants for this year's main onion crop. I've tried buying onion plants here in town, but the ones the local greenhouse has each spring don't last in storage. A couple of times in the past, I've asked if they could stock some different, better-storing, varieties. But they've repeatedly refused, saying most people want only fresh-eating onions. I can understand their not wanting to stock something they don't think will sell - I realize I probably live differently than most around here. So I've found myself an onion grower that ships what I want to grow - Dixondale Farms. I'm very pleased with both the varieties available and the condition of the plants I've received from them in the past. They're a bit pricey if you're only going to get one bunch, but the price goes down with each additional bunch and shipping is free. If you only have a small space for onions, maybe see if any of your gardening friends want to go in with you on an order.

According to their planting maps, my home in northern Nevada is on the boundary between the intermediate- and long-day onion types. Long-day onions do best north of here, where the summer daylight hours are longest, but will also do well here if planted early enough. I prepared my "early" garden bed last fall, setting out garlic and shallots then, scattering a few spinach and arugula seeds then too. The rest of that bed is just waiting for my earliest sowing of peas, lettuces, and the onions. My onion plants are scheduled to arrive in mid-March. That sounds good to me - folklore says to plant your peas on St Patrick's Day, so I'm hoping the weather will cooperate enough to let me get that whole bed planted then.

They package about 60 onion plants in a bunch; I ordered two bunches. I like yellow Copra onions. I know they grow well here, and easily hold in storage until the following July. So I ordered one bunch of them. Then, since I love experimenting too, I'm trying something new. They have a Long-Day Sampler bunch, a combination of yellow Walla Walla, for eating fresh in the summer plus some fall canning, white Ringmaster for canning and early winter cooking, and Red Zeppelin, a red variety that is supposed to store 6-8 months. If all do well, that should be enough.

Sunday, January 30, 2011

Raising Functioning Adults

I don't have children. I married rather late in my childbearing years, to someone who knew he didn't want children. I was ambivalent about the whole thing (I'm the oldest of five, so already knew quite a bit about the non-romantic aspects of caring for babies). So when it came right down to making the decision I was ok with agreeing to no children (truth be told, I'm probably too selfish anyway).

But I like being an auntie. Some of my older nieces and nephews through marriage I'm not very close to. I probably entered their lives too late to form much of a relationship or, being a "second wife," maybe was never thought of as their real aunt. I don't know - water under the bridge. Some of the interpersonal relationships in my inlaws' family are a bit bewildering to me anyway.

But I treasure the relationship I have with the children of my own siblings. I'm especially close to my California sister (let's call her Annodear), and have been a part of her two boys' lives on a regular basis since they were born. They're seniors in high school now (yes, twins), starting to think about college and leaving the nest.

Our mom always said her goal was to raise self-sufficient adults. She succeeded, too. All of us have had our fits and starts, ups and downs, but we are all, indeed, leading successful lives. Annodear has the same aspiration, and she and her husband are doing an admirable job. Besides overseeing their schoolwork, the quest for a driver's license, assigning their share of the household chores, Annodear has also included some life skills lessons.

When I first went away to college myself, as a teen, it was interesting to see how many freshmen boys were suddenly wearing pink t-shirts and socks - one red shirt in with the whites will do that, and they obviously had never had to deal with doing their own laundry. Annodear's boys have learned about laundry.

Sewing is another one of those life lessons. At the very least, the boys now know how to thread a needle, sew on a button, patch holes in their pants, and hand-sew a seam. Money management, too, is an on-going lesson.

The ability to feed one's self, without resorting to a diet of fast food and vending machine fare, is their latest endeavor. Annodear has a blog, writing even more sporadically than I. But she did just recently write about how a household with two working adults and two teenage boys deal with mealtime chores. I think it's a great plan - read more about it on her blog, here (the above photo is in my kitchen, after Thanksgiving dinner - the first time the boys, raised in a house with an automatic dishwasher, had been faced with a sinkful of dirty dishes. I gave them a quick lesson in washing dishes by hand, and left them to it).

Thursday, January 27, 2011

Thrift Shop Linen

Whenever I find myself in a thrift shop, I gravitate to the linens section. I have a real weakness for hand-embroidered cotton - pillowcases, tea towels, tablecloths. I'll patiently go through stacks of polyester in hopes of finding something interesting. Sometimes, I get lucky.

This thrift shop find - a strange little x-shaped piece of cotton lawn, beautifully embroidered, its scalloped edges finished with buttonhole stitch - was my key to finding the best way to store fresh greens. It's my turn to post for the Co-op, so I just finished writing more about storing greens over at the Simple Green Frugal blog. For more tips and recipes, here's a cool website about cutting food waste and making the most of the food you buy.

Wednesday, January 19, 2011

First New Life in the Garden

A couple of warm days, after weeks of snow and way-below freezing temps, and the snow has melted. Of course, seasonal temperatures are forecast to return later today, but in the meantime I got the chance to check on the garden.

No sign of the fall-planted garlic or shallots yet. But, looking closely, I find the spinach and arugula have germinated. Broadcast last fall, watered in by the melting snow, there won't be much growth to be seen just yet. But they can take the freezing weather yet to come, and their roots will start reaching down deep. Then, as the days get longer and warmer, they'll have a good foundation to start putting on top growth. I've found sowing in fall the best way to get a good harvest from these two quick-to-bolt greens. And that harvest comes when I really start craving something green and fresh; when I'm getting tired of stored cabbages and roots.

The leeks too, are perking up and starting to fill out. Young plants divided and set out last summer sent up seed stalks. I broke the seed stalks off, and left the plants in place in the fall. Now, with the snow melt, they've started growing again. I'll leave them to bulk up for the next couple of months, harvesting them for fresh use usually in March and earliest April. Dormant season gardening is soooo easy.

I like experimenting with storing food too. Right now we're snacking on fresh chocolate zucchini bread. I made a three-loaf batch yesterday from a monster zucchini stored in the cellar. The skin was a bit tough, so I skimmed that off with the veggie peeler, and scooped out most of the seeds with a spoon. One-third of the zuke we had as a dinner vegetable, sauteed in olive oil with onions and garlic; the rest shredded for the bread recipe. And there's still one more left in the cellar, looking good.