
Showing posts with label playing with needles. Show all posts
Showing posts with label playing with needles. Show all posts
Saturday, March 10, 2012
Salvaging a Tattered Tablecloth
As long as I had my sewing table and machine all set up, I took care of another little refashioning project today. After its last go-round in the washing machine, I had to admit that an old cotton tablecloth was finally too worn and tattered to continue using as such. The center was too fragile to even bother trying to patch; the holes unraveling more and more after each washing - not even strategic placement of doilies and placemats could disguise it any longer.
 But the edges, that had hung off the edge of the table, were still in pretty good condition. And it was such a nice, soft cotton fabric. With a bit of judicious cutting, I was able to salvage some nicely-sized rectangles. So, after a little time spent folding over and pressing the raw edges, and a quick hemming on the machine, I now have three lovely gingham dish towels for my kitchen, and a new liner for my bread basket.
Labels:
playing with needles,
thrifty arts

Friday, March 9, 2012
Aprons into Pillows
My home decor is still in my cozy red and white winter theme. The past few days, I made a couple of decorative refashioned items I've had on my to-do list for a while.
When I wander through thrift shops, I'm always drawn to the home and kitchen textile sections. I have a special weakness for hand-embroidery, patterned tablecloths, and cloth napkins, but try to limit myself to things that will actually go with my decor. Anyway, I couldn't resist a couple of red souvenir half aprons, the type they used to print up in the 1950's and '60's. One had snazzy gold gilt and black printing, featuring Reno, Nevada. It shows 50's era cars, the 1935 version Virginia Street's Reno Arch (replaced in 1963, it now straddles Lake Street near the Truckee River), the Washoe County Courthouse (early 20th century divorce mecca) plus two hotel/casinos, the Mapes (imploded in 2000) and the Riverside (saved at the last minute, same year). Since I live in northern Nevada, not far from Reno, I just had to have that one.


When I wander through thrift shops, I'm always drawn to the home and kitchen textile sections. I have a special weakness for hand-embroidery, patterned tablecloths, and cloth napkins, but try to limit myself to things that will actually go with my decor. Anyway, I couldn't resist a couple of red souvenir half aprons, the type they used to print up in the 1950's and '60's. One had snazzy gold gilt and black printing, featuring Reno, Nevada. It shows 50's era cars, the 1935 version Virginia Street's Reno Arch (replaced in 1963, it now straddles Lake Street near the Truckee River), the Washoe County Courthouse (early 20th century divorce mecca) plus two hotel/casinos, the Mapes (imploded in 2000) and the Riverside (saved at the last minute, same year). Since I live in northern Nevada, not far from Reno, I just had to have that one.

The second red apron was maybe a little bit newer, featuring the Royal Gorge Bridge in Colorado. It wasn't quite as flashy as the Reno one - no golden gilt, but black print with white - the lettering looks snow-topped, befitting for my memories of Colorado. I was born and raised in Colorado, and I've walked across that bridge. Built in the late 1920's, it's a wooden plank, narrow one-lane suspension bridge hanging more than 1,000 feet above the Arkansas River near Cañon City (I had my Afghan hound, Omar, at the time, and he was walking with me. For the first half of the trip across, he was a happy dog, bouncing along on his leash, back and forth, here and there. And then a car passed us, rumbling and bouncing the bridge quite a bit. Omar looked down into the cracks between the planks and realized just where he was. His tail sank between his legs. For the rest of the trip across and back, you could have used that morose dog to align a center line on that bridge. As for me, I love heights. I was leaning over the railing, spitting).

I never wear half-aprons, so I'd always envisioned these transformed into pillows. Since aprons, by their nature, are wider than they are tall, I had to do a bit of piecing to turn them into square pillow covers - especially the Royal Gorge one, since it originally had the print and the picture side-by-side. Fusible interfacing reinforced the piecing seams and gave the fronts a nice smooth look.
I bought a red and black cotton print for the back sides, pre-shrunk everything, added zipper closings, and stuffed my two Christmas pillows inside (I'm planning to make a couple of summertime covers the same size, and then I'll tuck these covers inside the back when I change decor. In a small house, storage in plain sight works really well. That plaid pillow, above is really a bed pillow, in a flannel bed pillowcase. By shaking the pillow down into the bottom of the case, then compacting it by tucking the pillowcase ends inside-out smoothly into the back side of the pillow I make my guest bed pillows into square decorative pillows. And using different pillowcases, they're just as easy to change to fit my seasonal decor).
The pillow covers needed a bit of edging trim to really finish them off. I thought, at first, about gold braid or fringe, but decided that would make them look too bordello. So I went, instead, with a narrow black rope trim - showcasing the print, setting the pillows off nicely, and giving them a finished professional look. They turned out just like I'd envisioned!
Monday, September 5, 2011
My Garden Chair
I think every garden, no matter how large or small, needs a place to sit. Maybe just as a place to rest a bit, or your spot to enjoy the sights and sounds of nature, or maybe it's a secret hideaway. It could be a folding chair, the tailgate of a truck, an old bench, an upright chunk of log, a low stool underneath a bean teepee, or maybe even a swing. Extra points if you also have a table close by - a place to set a cold drink, seeds and tools, your gathering basket, maybe even a radio.
I have an old cast-aluminum chair just inside my garden gate, next to an old cable spool that serves as a table. The plastic arms cracked apart from the sun years ago, but once I removed the screws holding the shattered bits the metal arms were quite comfortable. Then, the cheap cushion I had on it finally fell irreparably apart last season. However, I could still sit on the metal frame, so that's what I've been doing. It wasn't very comfortable though, and a bit too low besides.
 Then, a couple of days ago I rediscovered a slab of foam up in the rafters of the shed - and it was just the right size for a new chair cushion. We have a mill ends fabric store in town, so I stopped by to check prices and their stock of outdoor canvas (aka Sunbrella). A beautiful floral stripe remnant caught my eye right away, and amazingly it turned out to be just big enough (plus, perfectly sized to be able to center the flower part on both front and reverse sides, back and seat, too). Isn't it wonderful when things work out so perfectly? Ten dollars spent, an afternoon spent sewing, and once again I have a comfortable place to sit while out in my garden.
I have an old cast-aluminum chair just inside my garden gate, next to an old cable spool that serves as a table. The plastic arms cracked apart from the sun years ago, but once I removed the screws holding the shattered bits the metal arms were quite comfortable. Then, the cheap cushion I had on it finally fell irreparably apart last season. However, I could still sit on the metal frame, so that's what I've been doing. It wasn't very comfortable though, and a bit too low besides.
 Then, a couple of days ago I rediscovered a slab of foam up in the rafters of the shed - and it was just the right size for a new chair cushion. We have a mill ends fabric store in town, so I stopped by to check prices and their stock of outdoor canvas (aka Sunbrella). A beautiful floral stripe remnant caught my eye right away, and amazingly it turned out to be just big enough (plus, perfectly sized to be able to center the flower part on both front and reverse sides, back and seat, too). Isn't it wonderful when things work out so perfectly? Ten dollars spent, an afternoon spent sewing, and once again I have a comfortable place to sit while out in my garden.
Labels:
playing with needles,
the vegetable garden
Saturday, January 15, 2011
Just A Bit Cross-Eyed
During three seasons of the year, I spend most of my evenings outside. There's always something to be done in the garden or the rest of the yard. But in the dead of winter, when it's cold and the dark comes early, I end up in the living room, keeping warm close to the wood stove.
Aries watches tv, and I like to read. But sometimes I'll be kinda listening and/or watching whatever he has on, and then I like having something in my hands to work on. Many years ago, when I was young and could see better :-P I started working on a little counted cross-stitch set of the 12 days of Christmas - early-American versions, as opposed to the more-common English stuff. I'd done two and started on the third (a crazy-inducing black and white Barred Plymouth Rock hen, instead of a French one, whatever that is), when the days started getting longer. So I stashed them away in the closet. And there they sat.
Around Thanksgiving this year, needing something to work on, I dug them back out and have been diligently plugging away on them again. They're a nice little handwork size - fitting within a 5" hoop. I figure I'd better get them finished while I can still focus on that 18-count material - that's 18 teeny x's to the inch (what was I thinking!).
 I now realize I can't wear my contact lenses to work on them either. I usually wear mono-vision contacts - using my right eye for reading, my left eye for distance. It's worked great for me for years - my brain just automatically knows which eye to use when. But it means I have no close-up depth perception. I can't thread the needle! Nor easily focus on getting the needle into those teeny tiny holes, especially when I'm filling in a new color in-between areas I've already worked. So I'm wearing my glasses instead. With the lamp shade tilted to get more light. This gettin' older ain't for sissies!
And then, I started on that damn swan-a-swimming, working with white and cream threads on ivory material! It was almost like working in braille. I could feel the raised threads of the x's better than I could see them. That one I finally finished up in the mornings, sitting in front of the east window so I could see what I was doing.
Working on teeny cross-stitches kinda starts messing with my mind after a while, too. I stop seeing parts of x's, and start focusing on the empty diamond spaces in between instead - sort of a negative space kind of thing. Or half an x looks like a natural extension of the one diagonally above it. It takes some concentration to readjust back to seeing where I need to start the opposite-side slashes, in the middle of that diagonal.
 Stitching the x's, too, is a bit like working in watercolors, or with a soft-focus filter on a camera. The colors kinda run and blend together. But then, when the x's are all finished, I love how it suddenly all comes into sharp, pulled-together focus with the addition of the outline stitches. And once again, I'm amazed at how just trusting the process, I end up with something looking pretty good.
Aries watches tv, and I like to read. But sometimes I'll be kinda listening and/or watching whatever he has on, and then I like having something in my hands to work on. Many years ago, when I was young and could see better :-P I started working on a little counted cross-stitch set of the 12 days of Christmas - early-American versions, as opposed to the more-common English stuff. I'd done two and started on the third (a crazy-inducing black and white Barred Plymouth Rock hen, instead of a French one, whatever that is), when the days started getting longer. So I stashed them away in the closet. And there they sat.
Around Thanksgiving this year, needing something to work on, I dug them back out and have been diligently plugging away on them again. They're a nice little handwork size - fitting within a 5" hoop. I figure I'd better get them finished while I can still focus on that 18-count material - that's 18 teeny x's to the inch (what was I thinking!).
 I now realize I can't wear my contact lenses to work on them either. I usually wear mono-vision contacts - using my right eye for reading, my left eye for distance. It's worked great for me for years - my brain just automatically knows which eye to use when. But it means I have no close-up depth perception. I can't thread the needle! Nor easily focus on getting the needle into those teeny tiny holes, especially when I'm filling in a new color in-between areas I've already worked. So I'm wearing my glasses instead. With the lamp shade tilted to get more light. This gettin' older ain't for sissies!
And then, I started on that damn swan-a-swimming, working with white and cream threads on ivory material! It was almost like working in braille. I could feel the raised threads of the x's better than I could see them. That one I finally finished up in the mornings, sitting in front of the east window so I could see what I was doing.
Working on teeny cross-stitches kinda starts messing with my mind after a while, too. I stop seeing parts of x's, and start focusing on the empty diamond spaces in between instead - sort of a negative space kind of thing. Or half an x looks like a natural extension of the one diagonally above it. It takes some concentration to readjust back to seeing where I need to start the opposite-side slashes, in the middle of that diagonal.
 Stitching the x's, too, is a bit like working in watercolors, or with a soft-focus filter on a camera. The colors kinda run and blend together. But then, when the x's are all finished, I love how it suddenly all comes into sharp, pulled-together focus with the addition of the outline stitches. And once again, I'm amazed at how just trusting the process, I end up with something looking pretty good.
Labels:
playing with needles
Tuesday, November 16, 2010
Tie One On - Pillowcase Apron Tutorial
Once you start getting into the simple lifestyle, sooner or later you're going to want an apron. I have my favorite bib-style H-back one that I usually wear. But I like having a couple extra aprons around too - guest aprons, you might say. My sister and her family usually visit for Thanksgiving. She loves it when I offer her an apron to wear too. It just makes her feel more "in the spirit", she says.
 Once you have one for yourself, and maybe one or two for your guests, consider making an extra apron or two for Tie One On Day. Started by EllynAnne Geisel, it's a way to put the "give" back in Thanksgiving: "Participation is simple: on the day before Thanksgiving, November 24th this year, pause in the preparation of your own meal, wrap a loaf of bread or other baked good (maybe my One-Hour French Bread?) in an apron, tuck a prayer or note of encouragement in the pocket, and deliver the wrapped bundle to someone without your bounty - a neighbor, friend, or family member in need of physical or spiritual sustenance, a bit of recognition, or just a kind word."
 Half-aprons make a good project for even beginning sewers. A quick and easy way to make a cute half-apron is to start with a pillowcase. Nice ones can usually be found at your local thrift store for $1 or less. I look for ones with some kind of different print or decoration around the opening end. That end makes the skirt of your apron - cut it between 16 and 20 inches long for a nice length (to make nice straight cuts, I measure and make a small mark on the edge where I want each cut. I fold the material over at the mark, align the sides and smooth everything flat, and then slip my scissors inside the fold to cut.) The middle cross-cuts make the waistband and ties. Cut two equally sized strips about 3" wide (I'm using a King case here, so I had enough material to cut three. I used one as a center piece and then trimmed half off the other two. Using all three would make ties long enough to wrap around and tie in front, for a different look) . Cut the sewn side seam off the skirt and band pieces. The closed end will make the two pockets, so don't cut the pillowcase seams on that piece.
 Fold the raw side edges of the skirt, where you just cut the pillowcase seam away, over twice to the wrong side, press, and sew down.
 Make the pockets by cutting the top corner parts of the case into two equal squares (discard the center piece). Turn the corner inside-out, flatten, and stitch down the remaining two open sides of the square, leaving an inch or two left unstitched to be able to turn right-side out. Turn (you can clip the tips of the corners, then use a crochet hook to push the corners out to a nice point) and press flat, tucking the unsewn part evenly to the inside. Repeat on the other pocket.
 Lay the skirt out flat and position the pockets an inch or two on either side of the center. Try different positions until you have something you like best - maybe with the pattern running perpendicular to the skirt's or putting the pockets on an angle. Just make sure that the unstitched part of the pocket edge isn't part of the top edge (top-stitch it to close it up if you just have to have it on the top part). Pin in place, then sew down three sides close to the edge of the pocket, leaving the top open. I like to spin the pocket around and run a second line of stitching just inside the first. You might like the look of using a contrasting color of thread too.
 Join the ends of the waistband/ties. Press the seam edges open, and then fold over and press one long side. Find the center of the long piece, then lay the long piece right-side UP on your work surface with the folded side farther away from you (flip the piece over long-ways from the way it is in the above photo).
 Lay the skirt, also right-side UP, on top of the long piece, matching centers of both pieces, the raw edges closest to you, and put a pin in the center. You can just pin the pieces together flat, but I like to gather or pleat the skirt a bit. If you want to gather yours, measure out equal distances either side of your center pin on the band piece, and pin the outside edges of the skirt there. Then pin in your pleats or gathers, matching what you do to one side on the other side. Sew skirt to band (I find it easiest to have the skirt part on top when sewing too, so that I can do any final adjustments to my pleats or gathers).
 Fold the bottom edge of the waist ties up and press. Fold the top edge down, matching the folded edges together on the ties, and covering the line of stitching on the front of the skirt, and pin. Tuck the raw ends of the ties to the inside and pin them too, making a nice corner.
 Top stitch the end of a tie, along the folded edges, across the top front of the skirt, along the folded edge of the other tie and across the end. A final quick pressing and you're done!
 Once you have one for yourself, and maybe one or two for your guests, consider making an extra apron or two for Tie One On Day. Started by EllynAnne Geisel, it's a way to put the "give" back in Thanksgiving: "Participation is simple: on the day before Thanksgiving, November 24th this year, pause in the preparation of your own meal, wrap a loaf of bread or other baked good (maybe my One-Hour French Bread?) in an apron, tuck a prayer or note of encouragement in the pocket, and deliver the wrapped bundle to someone without your bounty - a neighbor, friend, or family member in need of physical or spiritual sustenance, a bit of recognition, or just a kind word."
 Half-aprons make a good project for even beginning sewers. A quick and easy way to make a cute half-apron is to start with a pillowcase. Nice ones can usually be found at your local thrift store for $1 or less. I look for ones with some kind of different print or decoration around the opening end. That end makes the skirt of your apron - cut it between 16 and 20 inches long for a nice length (to make nice straight cuts, I measure and make a small mark on the edge where I want each cut. I fold the material over at the mark, align the sides and smooth everything flat, and then slip my scissors inside the fold to cut.) The middle cross-cuts make the waistband and ties. Cut two equally sized strips about 3" wide (I'm using a King case here, so I had enough material to cut three. I used one as a center piece and then trimmed half off the other two. Using all three would make ties long enough to wrap around and tie in front, for a different look) . Cut the sewn side seam off the skirt and band pieces. The closed end will make the two pockets, so don't cut the pillowcase seams on that piece.
 Fold the raw side edges of the skirt, where you just cut the pillowcase seam away, over twice to the wrong side, press, and sew down.
 Make the pockets by cutting the top corner parts of the case into two equal squares (discard the center piece). Turn the corner inside-out, flatten, and stitch down the remaining two open sides of the square, leaving an inch or two left unstitched to be able to turn right-side out. Turn (you can clip the tips of the corners, then use a crochet hook to push the corners out to a nice point) and press flat, tucking the unsewn part evenly to the inside. Repeat on the other pocket.
 Lay the skirt out flat and position the pockets an inch or two on either side of the center. Try different positions until you have something you like best - maybe with the pattern running perpendicular to the skirt's or putting the pockets on an angle. Just make sure that the unstitched part of the pocket edge isn't part of the top edge (top-stitch it to close it up if you just have to have it on the top part). Pin in place, then sew down three sides close to the edge of the pocket, leaving the top open. I like to spin the pocket around and run a second line of stitching just inside the first. You might like the look of using a contrasting color of thread too.
 Join the ends of the waistband/ties. Press the seam edges open, and then fold over and press one long side. Find the center of the long piece, then lay the long piece right-side UP on your work surface with the folded side farther away from you (flip the piece over long-ways from the way it is in the above photo).
 Lay the skirt, also right-side UP, on top of the long piece, matching centers of both pieces, the raw edges closest to you, and put a pin in the center. You can just pin the pieces together flat, but I like to gather or pleat the skirt a bit. If you want to gather yours, measure out equal distances either side of your center pin on the band piece, and pin the outside edges of the skirt there. Then pin in your pleats or gathers, matching what you do to one side on the other side. Sew skirt to band (I find it easiest to have the skirt part on top when sewing too, so that I can do any final adjustments to my pleats or gathers).
 Fold the bottom edge of the waist ties up and press. Fold the top edge down, matching the folded edges together on the ties, and covering the line of stitching on the front of the skirt, and pin. Tuck the raw ends of the ties to the inside and pin them too, making a nice corner.
 Top stitch the end of a tie, along the folded edges, across the top front of the skirt, along the folded edge of the other tie and across the end. A final quick pressing and you're done!
Labels:
baking,
building community,
playing with needles,
thrifty arts
Saturday, July 3, 2010
Make a Jeans Skirt
My Soroptimists Club is working a booth at a local Chili Cookoff this weekend, and since it's the Fourth of July we're going with a red, white, and blue theme. It's gonna be too hot for blue jeans, so I made myself a blue jeans skirt this afternoon.
 Since it's also my turn to post on the Simple Green Frugal Co-op blog, I took pictures of my little project and wrote a tutorial. I've been refashioning jeans into skirts for decades. It's easy enough for even a beginning sewer, and a great use if you have a pair of favorite pants where the inseam is starting to wear. Check it out here.
 Since it's also my turn to post on the Simple Green Frugal Co-op blog, I took pictures of my little project and wrote a tutorial. I've been refashioning jeans into skirts for decades. It's easy enough for even a beginning sewer, and a great use if you have a pair of favorite pants where the inseam is starting to wear. Check it out here.
Labels:
playing with needles,
thrifty arts
Friday, April 2, 2010
Flat to Fitted Flannel
(Try saying that post title three times quickly) I love having flannel sheets on my bed when it's cold. They're so nice and snuggley, warm to the touch as soon as you get into bed. So for six months out of the year, my bed is made up with flannel sheets.
But flannel sheets are sold in "sets", and therein lies the problem. The fitted bottom sheet always wears out first. First the flanneling wears off, leaving just a regular-type sheeting material. I can live with that, but then even that wears thin, and eventually shreds or tears. If sheet manufacturers really wanted to package a practical sheet set, it would have two bottom sheets with a coordinating flat top sheet, pillowcases optional or sold separately. They'd have my undying consumer loyalty forever (100% cotton please - I can't stand any amount of polyester in my bedding).
I buy a new flannel sheet set every few years, when the previous bottom sheet becomes too worn. I looked at the flannel sheet sets on sale at Christmas time, but decided the current one would make it through until warmer weather got here. It didn't (a very wet winter meant I haven't been able to completely dry my sheets out on the clothesline as often - having to use the dryer really took its toll). About a month ago, I noticed a really thin spot. The past couple of weeks, the mattress cover underneath started showing through, and I knew it would be only a matter of time before it ripped completely.
But it's still so cold at night. I didn't really want to change over to cotton percale sheets yet. So, a few days ago, I went sheet shopping. But, no luck - local stores are all out of their flannel sheet sets until next winter. I double-checked my linen shelf - maybe there was a forgotten flannel fitted sheet for our bed at the bottom of the stack. Nope, just three orphaned flannel top sheets.
Now, I'm a real Princess and the Pea when it comes to my bed. Forget a lump the size of a pea, the thickness of a creased sheet will bother me. I want the nice flat, smoothness of a fitted bottom sheet. Those flat sheets just won't do for a bottom sheet. Well, duh - I have a sewing machine and thread, and I do know how to sew. I can make fitted corners, no problem.
 We have a pillowtop mattress, so we don't flip it, but I do spin it top to bottom every six months to equalize the wear. To remind myself, I rotate the mattress around the equinoxes. On this week's sheet-laundry day, I had already planned to turn the mattress. So, since I had the mattress up out of the bed frame, I laid the nicest, thickest flat flannel top sheet out over it, upside down to make the pinning easier, and fitted each corner. I didn't want to cut the fabric and finish the edges inside the corners, so after sewing up the corner, I then folded the excess triangle over to the head and foot sides and sewed that part down (like wrapping a package and taping down the corners). Last little bit was making a small corner to fit underneath the mattress, folding and stitching that part down as well. It's not really pretty, but who's going to see it? It works. And once again, our bed is warm and snuggley, with a nice stretched smooth fit. And the old fitted sheet? The center is worn thin, but around the outside edges, the fabric is still quite good. I think there's enough there to make myself a pair of flannel pajama pants.
But flannel sheets are sold in "sets", and therein lies the problem. The fitted bottom sheet always wears out first. First the flanneling wears off, leaving just a regular-type sheeting material. I can live with that, but then even that wears thin, and eventually shreds or tears. If sheet manufacturers really wanted to package a practical sheet set, it would have two bottom sheets with a coordinating flat top sheet, pillowcases optional or sold separately. They'd have my undying consumer loyalty forever (100% cotton please - I can't stand any amount of polyester in my bedding).
I buy a new flannel sheet set every few years, when the previous bottom sheet becomes too worn. I looked at the flannel sheet sets on sale at Christmas time, but decided the current one would make it through until warmer weather got here. It didn't (a very wet winter meant I haven't been able to completely dry my sheets out on the clothesline as often - having to use the dryer really took its toll). About a month ago, I noticed a really thin spot. The past couple of weeks, the mattress cover underneath started showing through, and I knew it would be only a matter of time before it ripped completely.
But it's still so cold at night. I didn't really want to change over to cotton percale sheets yet. So, a few days ago, I went sheet shopping. But, no luck - local stores are all out of their flannel sheet sets until next winter. I double-checked my linen shelf - maybe there was a forgotten flannel fitted sheet for our bed at the bottom of the stack. Nope, just three orphaned flannel top sheets.
Now, I'm a real Princess and the Pea when it comes to my bed. Forget a lump the size of a pea, the thickness of a creased sheet will bother me. I want the nice flat, smoothness of a fitted bottom sheet. Those flat sheets just won't do for a bottom sheet. Well, duh - I have a sewing machine and thread, and I do know how to sew. I can make fitted corners, no problem.
 We have a pillowtop mattress, so we don't flip it, but I do spin it top to bottom every six months to equalize the wear. To remind myself, I rotate the mattress around the equinoxes. On this week's sheet-laundry day, I had already planned to turn the mattress. So, since I had the mattress up out of the bed frame, I laid the nicest, thickest flat flannel top sheet out over it, upside down to make the pinning easier, and fitted each corner. I didn't want to cut the fabric and finish the edges inside the corners, so after sewing up the corner, I then folded the excess triangle over to the head and foot sides and sewed that part down (like wrapping a package and taping down the corners). Last little bit was making a small corner to fit underneath the mattress, folding and stitching that part down as well. It's not really pretty, but who's going to see it? It works. And once again, our bed is warm and snuggley, with a nice stretched smooth fit. And the old fitted sheet? The center is worn thin, but around the outside edges, the fabric is still quite good. I think there's enough there to make myself a pair of flannel pajama pants.
Labels:
playing with needles,
thrifty arts
Thursday, April 1, 2010
Casting Call
I love hearing from my readers - both in the comments and via emails sent to my address in the sidebar. Most are questions about things I've written about - those I try to help, or tell them where they might find the information they seek. Others are requests for links or free advertising. Those, I'll consider regarding the applicability to the things I write about and the tenor of this blog. And every once in a while, I'll get something really different.
Survivor is the only reality-type television show I watch regularly. But I know those types of shows are very popular with the general public right now. For me, I don't like seeing myself in videos, or hearing recordings of me speaking. Reality just doesn't jibe with my own self-image, and I prefer to maintain my self-delusions. Plus, I tailor and re-fashion my own clothes, to fit my own ideas about style. But for those that don't suffer from those restrictions, I'll relay the contents of an email I recently received.
The people that produce Project Runway are putting together a new show, featuring a couple of top designers, and are looking for everyday people with a special event coming up. Here's what they sent me, should you wish to "audition"
"Do you have an event that justifies a new designer outfit, but have nothing to wear?! (Wedding/Birthday/Reunion/Shower/etc) We are currently casting for a new cable network television program featuring two top designers. They will be traveling the country, designing one-of-a-kind outfits for women who need something extraordinary to wear to an important event in their lives.
"If you live in a SMALL TOWN in Oklahoma, Texas, Arkansas, Louisiana, West Virginia, Virginia, Tennessee, Kentucky, North Carolina, California or Nevada and you're interested in this once-in-a-lifetime experience, more information here.
(The Event in California or Nevada must take place in July or August of 2010 - and fall on a SATURDAY. We will be meeting ladies in the next 3 weeks to put them on tape.)"
There you have it. Anyone that dreams of being on television, wearing a custom-made designer creation to an upcoming special event, can take it from here (no fooling).
Survivor is the only reality-type television show I watch regularly. But I know those types of shows are very popular with the general public right now. For me, I don't like seeing myself in videos, or hearing recordings of me speaking. Reality just doesn't jibe with my own self-image, and I prefer to maintain my self-delusions. Plus, I tailor and re-fashion my own clothes, to fit my own ideas about style. But for those that don't suffer from those restrictions, I'll relay the contents of an email I recently received.
The people that produce Project Runway are putting together a new show, featuring a couple of top designers, and are looking for everyday people with a special event coming up. Here's what they sent me, should you wish to "audition"
"Do you have an event that justifies a new designer outfit, but have nothing to wear?! (Wedding/Birthday/Reunion/Shower/etc) We are currently casting for a new cable network television program featuring two top designers. They will be traveling the country, designing one-of-a-kind outfits for women who need something extraordinary to wear to an important event in their lives.
"If you live in a SMALL TOWN in Oklahoma, Texas, Arkansas, Louisiana, West Virginia, Virginia, Tennessee, Kentucky, North Carolina, California or Nevada and you're interested in this once-in-a-lifetime experience, more information here.
(The Event in California or Nevada must take place in July or August of 2010 - and fall on a SATURDAY. We will be meeting ladies in the next 3 weeks to put them on tape.)"
There you have it. Anyone that dreams of being on television, wearing a custom-made designer creation to an upcoming special event, can take it from here (no fooling).
Labels:
California,
Carson City,
playing with needles
Thursday, November 12, 2009
Keeping Busy
When I get a nice day, I try to get outside to work a while in the yard. Aries dug the last of our finished compost into half of one garden bed for me a couple of days ago. So I planted my garlic and shallots for next year, along with a few spinach and arugula seeds. I got the grass and weeds pulled out of the strawberry bed, thinning out some of the runners in the process, and then mulched them with straw for the winter.
 The chickens are let out of their pen each day now, on pest patrol, but a couple of them have been flying over the garden fence. So when I finish up with something in the garden, I have to cover it with wire or they'll dig it up again. Every once in a while, I'll hear them all start squawking and really raising a ruckus outside. That usually means the hawk is back. This morning, he posed on the deck railing long enough for me to snap a photo through the kitchen window. I don't think he's big enough to take one of the chickens, but he sure makes everybody nervous when he's hanging around. They huddle under the lilacs, the picnic table, and the deck steps. I hope he's just looking for the mice and sparrows that come after the chicken feed.
When the weather is too windy, cold, or wet, I keep busy indoors. All of the peppers and chiles have been processed for the year - the chipotles done and packed away, the bells chopped into pieces and frozen, the habaneros made into a batch of hot sauce. Reliance red seedless grapes are supposed to hold for a few months in storage, and mine have. I just got the of them I'd stashed in the cellar cleaned and into the dehydrator.
 It was my turn to post on the SGF Co-op blog today. I've been trying to make a few pillowcase aprons for National Tie One On Day, November 25th. I took photos while making this one, and posted a tutorial. Made from a thrifted pillowcase in an hour or two, it's a great project even for beginning sewers. Need an apron before Thanksgiving gets here? Check it out!
 The chickens are let out of their pen each day now, on pest patrol, but a couple of them have been flying over the garden fence. So when I finish up with something in the garden, I have to cover it with wire or they'll dig it up again. Every once in a while, I'll hear them all start squawking and really raising a ruckus outside. That usually means the hawk is back. This morning, he posed on the deck railing long enough for me to snap a photo through the kitchen window. I don't think he's big enough to take one of the chickens, but he sure makes everybody nervous when he's hanging around. They huddle under the lilacs, the picnic table, and the deck steps. I hope he's just looking for the mice and sparrows that come after the chicken feed.
When the weather is too windy, cold, or wet, I keep busy indoors. All of the peppers and chiles have been processed for the year - the chipotles done and packed away, the bells chopped into pieces and frozen, the habaneros made into a batch of hot sauce. Reliance red seedless grapes are supposed to hold for a few months in storage, and mine have. I just got the of them I'd stashed in the cellar cleaned and into the dehydrator.
It was my turn to post on the SGF Co-op blog today. I've been trying to make a few pillowcase aprons for National Tie One On Day, November 25th. I took photos while making this one, and posted a tutorial. Made from a thrifted pillowcase in an hour or two, it's a great project even for beginning sewers. Need an apron before Thanksgiving gets here? Check it out!
Sunday, November 8, 2009
Crafty Camouflage
I took down the curtains in my bedroom and kitchen and washed them today. We use mini-blinds for privacy, so the curtains are just decorative, lightweight cotton in the kitchen, lace in the bedroom. Before putting them back up, I iron them with spray starch. I think it gives my homemade curtains a professional look, and might even resist dust. I'm curious. Surely, I'm not the only crafty frugal homemaker out there. Anyone else out have an item of clothing that matches a part of your decor?


Not even your old blue jeans?


Not even your old blue jeans?

Labels:
home projects,
playing with needles,
thrifty arts
Sunday, November 23, 2008
A New Apron
An organization I belong to decided to have a booth at a crafts fair as a fundraiser. They asked the members to make and donate things to sell, so  I made some insulated teapot cozies. I had the insulation padding, so just needed to go through my fabric stash and put together some nice coordinating bits of cotton. I don't have pictures of any of the ones I made to sell, but in the process I found a yard of a flowered print with colors I just love. How convenient! My old apron had just ripped, worn through too thin to even patch, so I had been thinking I should make myself a new one. Re-discovering that green/pink/maroon print in my stash was wonderful timing!
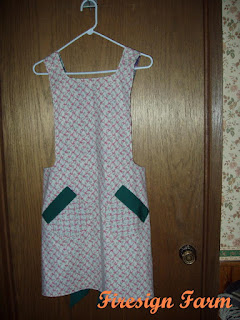 This time, I wanted to make a reversible apron - one side for cooking, one side for baking. The dark green flower side would hide gravy and tomato sauce spatters. Now I just needed a lighter colored fabric for the flour side. I have an old duvet cover (is that redundant?) I don't use anymore. The bottom side of that is a little diagonal pink ribbon/green flower print on white - that would be perfect! Time for a little re-purposing then. Now for a pattern. I don't like aprons that hang on my neck. I prefer ones that go over my shoulders. I've made a pattern from an old bib-type granny apron I like, so I was ready to sew.
 So I've been busy sewing. First the fundraiser tea cozies, to get them ready in time for the crafts fair. Then, when I cut out the new apron pieces from the dark green flower fabric, I had just enough left over to make myself a new teapot cozy too - the one at the top of this post. With a bit of solid dark green for pocket trim and waist ties (and the cozy lining), I have a brand new, double-sided reversible apron just in time for cooking Thanksgiving dinner. And I got all the sewing finished just in time too. I had to put away my sewing machine and table in order to change that room over into guest room status. My mom flew in from Colorado yesterday, and my sister and her family will be here from California in a couple more days. The more, the merrier!
 I made some insulated teapot cozies. I had the insulation padding, so just needed to go through my fabric stash and put together some nice coordinating bits of cotton. I don't have pictures of any of the ones I made to sell, but in the process I found a yard of a flowered print with colors I just love. How convenient! My old apron had just ripped, worn through too thin to even patch, so I had been thinking I should make myself a new one. Re-discovering that green/pink/maroon print in my stash was wonderful timing!
 This time, I wanted to make a reversible apron - one side for cooking, one side for baking. The dark green flower side would hide gravy and tomato sauce spatters. Now I just needed a lighter colored fabric for the flour side. I have an old duvet cover (is that redundant?) I don't use anymore. The bottom side of that is a little diagonal pink ribbon/green flower print on white - that would be perfect! Time for a little re-purposing then. Now for a pattern. I don't like aprons that hang on my neck. I prefer ones that go over my shoulders. I've made a pattern from an old bib-type granny apron I like, so I was ready to sew.
 So I've been busy sewing. First the fundraiser tea cozies, to get them ready in time for the crafts fair. Then, when I cut out the new apron pieces from the dark green flower fabric, I had just enough left over to make myself a new teapot cozy too - the one at the top of this post. With a bit of solid dark green for pocket trim and waist ties (and the cozy lining), I have a brand new, double-sided reversible apron just in time for cooking Thanksgiving dinner. And I got all the sewing finished just in time too. I had to put away my sewing machine and table in order to change that room over into guest room status. My mom flew in from Colorado yesterday, and my sister and her family will be here from California in a couple more days. The more, the merrier!
Labels:
around our house,
playing with needles
Friday, October 3, 2008
Vintage-Look Clothespin Bag
When I was in Colorado in May, Mom gave me some vintage pattern transfer sheets. No envelopes or other identifying names -  just the big newsprint sheets with various projects on each - so I'm not sure where they're from. They look a bit like the Aunt Martha patterns still available today, but I've never seen any Aunt Martha ones like these. Anyway, I loved the one for a clothespin apron, with the image of a happy little clothespeg jumping on a bar of soap.
Years ago, I bought a cheap clothespin bag at the grocery store. The bag was a rough, paper-like material. It finally started to fall apart recently, so I jumped at the chance to use that old pattern. I cut a piece out of the edge of an old cotton sheet, too thin and worn in the middle to use on the bed anymore. The pattern suggested all different colors for the embroidery, but I was going for more of a vintage look so did the whole thing in red (a bit more about redwork here). I took the old bag apart so I could reuse the metal hanger part and the plastic strapping that holds the top open. I sewed up the new bag, complete with inside liner in the same cotton. I used some decorative stitching to hold the strapping in place, and punched in a couple of eyelets for the hanger part. I didn't realize how rough the old bag was, until I noticed how nice it was reaching into the new bag made out of lovely soft cotton.
I'll let you in on my favorite "secret" source for redwork and other outline embroidery patterns: children's coloring books. You can find just about anything, from Disney characters to Christmas scenes to fairy tales, sized just right for pillows or quilt squares. For anyone wanting to embroider their own happy little clothespeg, TipNut has the same transfer pattern as a scanned pdf on her site, along with links to lots more clothespin bag ideas. In fact, her entire site is a wealth of tips, patterns, and tutorials. Check it out!
 just the big newsprint sheets with various projects on each - so I'm not sure where they're from. They look a bit like the Aunt Martha patterns still available today, but I've never seen any Aunt Martha ones like these. Anyway, I loved the one for a clothespin apron, with the image of a happy little clothespeg jumping on a bar of soap.
Years ago, I bought a cheap clothespin bag at the grocery store. The bag was a rough, paper-like material. It finally started to fall apart recently, so I jumped at the chance to use that old pattern.
 I cut a piece out of the edge of an old cotton sheet, too thin and worn in the middle to use on the bed anymore. The pattern suggested all different colors for the embroidery, but I was going for more of a vintage look so did the whole thing in red (a bit more about redwork here). I took the old bag apart so I could reuse the metal hanger part and the plastic strapping that holds the top open. I sewed up the new bag, complete with inside liner in the same cotton. I used some decorative stitching to hold the strapping in place, and punched in a couple of eyelets for the hanger part. I didn't realize how rough the old bag was, until I noticed how nice it was reaching into the new bag made out of lovely soft cotton.
I'll let you in on my favorite "secret" source for redwork and other outline embroidery patterns: children's coloring books. You can find just about anything, from Disney characters to Christmas scenes to fairy tales, sized just right for pillows or quilt squares. For anyone wanting to embroider their own happy little clothespeg, TipNut has the same transfer pattern as a scanned pdf on her site, along with links to lots more clothespin bag ideas. In fact, her entire site is a wealth of tips, patterns, and tutorials. Check it out!
Labels:
playing with needles,
thrifty arts
Wednesday, April 9, 2008
Patching Knees
This is another Grammaw-inspired lesson. She never really sat down and showed me how to patch the knees of my blue jeans, but I was quite the little tomboy growing up so I had ample opportunity to see how it was done from the patches she, and Mom, put on my own blue jeans. This method works great - repairing the hole and reinforcing the entire knee area. It feels good to wear, blends right in, and gets softer right along with the pants over time.
 If a hole is in the seat or upper thigh of a pair of blue jeans, it can be reached, with a bit of maneuvering, to be patched on a sewing machine. I'll put the patch on the inside, and then just zig-zag stitch back and forth, up and down, until I've "quilted" the patch over the hole. But holes in the knee can't be fixed this way, unless you're willing to rip the leg seam and then sew it back up afterwards. Too much trouble - this way is easier and makes a long-lasting patch.
 It's very handy to keep the legs from an old worn-out pair of blue jeans around as a patch supply (or pick up the biggest pair you can find at a thrift store). You can even match the amount of fading to the pants to be patched - taking the patch from down near the hem for darker pants, and using the faded upper thigh for lighter ones. First, cut a patch quite a bit bigger than the hole, rounding the corners.
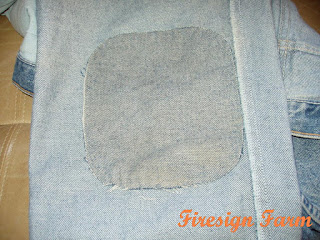 Turn the pant leg inside out and pin the patch down so that both "wrong sides" are up. Hide your knot between patch and pant material and then, about a quarter-inch away from the edge, start stitching the patch down with a running stitch around the edge - four to five stitches to the inch. Continue around, and when you get back to your starting place, continue with another round, a quarter-inch to the inside. Two rounds is enough, but you can keep circling around until you run out of thread, and then fasten off.
 Turn the pants leg right side out, and trim any long threads and end tufts from the hole. Keeping the pants leg as flat as possible to the patch (pin it if necessary), fold the ragged edges under and stitch with an overcast stitch, catching a bit of the patch material and then up through the edge of the fold. Tuck any loose threads under with the tip of your needle as you work your way around the rip. Fasten off, and you're done!
 If a hole is in the seat or upper thigh of a pair of blue jeans, it can be reached, with a bit of maneuvering, to be patched on a sewing machine. I'll put the patch on the inside, and then just zig-zag stitch back and forth, up and down, until I've "quilted" the patch over the hole. But holes in the knee can't be fixed this way, unless you're willing to rip the leg seam and then sew it back up afterwards. Too much trouble - this way is easier and makes a long-lasting patch.
 It's very handy to keep the legs from an old worn-out pair of blue jeans around as a patch supply (or pick up the biggest pair you can find at a thrift store). You can even match the amount of fading to the pants to be patched - taking the patch from down near the hem for darker pants, and using the faded upper thigh for lighter ones. First, cut a patch quite a bit bigger than the hole, rounding the corners.
 Turn the pant leg inside out and pin the patch down so that both "wrong sides" are up. Hide your knot between patch and pant material and then, about a quarter-inch away from the edge, start stitching the patch down with a running stitch around the edge - four to five stitches to the inch. Continue around, and when you get back to your starting place, continue with another round, a quarter-inch to the inside. Two rounds is enough, but you can keep circling around until you run out of thread, and then fasten off.
 Turn the pants leg right side out, and trim any long threads and end tufts from the hole. Keeping the pants leg as flat as possible to the patch (pin it if necessary), fold the ragged edges under and stitch with an overcast stitch, catching a bit of the patch material and then up through the edge of the fold. Tuck any loose threads under with the tip of your needle as you work your way around the rip. Fasten off, and you're done!
Labels:
playing with needles,
thrifty arts
Thursday, April 3, 2008
Learning to Embroider
I received a couple of interesting emails concerning my post on darning socks. My sister, also a darner (is that a word?), wrote, "I like doing mine in colors different from the socks... that way I can "see" & better enjoy my handiwork." I've found when I do that my mind registers "not sock" and I think I've got another hole, so I'm happiest with the patch as close a match as possible.
Another friend, Chris, wrote a lovely response: "Once a Scout, always a Scout. Where did you learn to darn? I learned as part of a sewing related badge in grammar school. Few people know the art; I did not inherit the wooden darning egg. Most people who know I knit my socks laugh at me ... and as one dear friend said, 'Why do you knit socks when you can buy a pair for $1.99?' How do you explain the love of the process? The feel of the wool in your hand? The gentle rhythm your life takes as you sit, knitting, listening to the birds who've come to the feeder you put out for them?"
What a wonderful thought! My knitting expertise is limited to cast on, knit, cast off, but she makes me want to pick up a pair of needles right now. Her question got me to thinking, though. Where did I learn to darn? I must have seen my maternal grandmother doing it, because somehow I knew you had to have an "egg" to do it (for years, I kept a silver L'eggs pantyhose egg for my darning egg). But I don't remember her ever really showing me what to do. I think darning is one of those things I more or less figured out on my own.
 My grandmother did teach me the art of embroidery. She used to embroider pillowcases, and I still have a pair she made for me. When I was about five or six, she sat down with me and some embroidery floss. She taught me to cut off a length, how to separate out two strands from the six; how to wet the ends in my mouth and then pull them between pursed lips to stiffen and flatten them so they would go through the eye of the needle. Then to cross the end over a wrap around my finger and roll it off and slide it down so I had a small knot with no tail hanging out.
 Then she gave me an embroidery hoop and a printed cross-stitch dresser scarf, helped me get the hoop in place with the material stretched taut, and set me to work. I'd played with sewing cards - pictures on rigid cardboard outlined with punched holes that a child could thread a shoestring up and down through, so I knew the general idea of sewing. Now I was going to learn how to do it with a sharp needle!
 I worked diligently on that red flower, and ran to show Grammaw when I reached the end of the thread. She admired my little x's, all lined up so nicely, and then turned the material over. I had a big clump of knots and tangles there, but I had just pulled things tight and kept sewing. Not good. She said, "the back has to look as good as the front," and then I couldn't believe it - she took her scissors and clipped my threads and sent me back to pick out all those stitches!
 I eventually finished it to her satisfaction, and then she had me hem it with a running stitch. To this day, I feel too guilty to run a length of thread across a gap instead of fastening off and restarting. I've found embroidery to be a wonderful pastime over the years - from my hippie days of decorating my denim, to playing with counted cross-stitch patterns, making up my own designs, and using the iron-on transfers I've found in garage sales and thrift stores. It's like painting with thread. I love using my collection of pillowcases and kitchen towels. Just seeing them makes me happy (and the backs look as good as the fronts). Thank you, Elizabeth Krukow Marks - Lizzie to most, Grammaw to me.

Another friend, Chris, wrote a lovely response: "Once a Scout, always a Scout. Where did you learn to darn? I learned as part of a sewing related badge in grammar school. Few people know the art; I did not inherit the wooden darning egg. Most people who know I knit my socks laugh at me ... and as one dear friend said, 'Why do you knit socks when you can buy a pair for $1.99?' How do you explain the love of the process? The feel of the wool in your hand? The gentle rhythm your life takes as you sit, knitting, listening to the birds who've come to the feeder you put out for them?"
What a wonderful thought! My knitting expertise is limited to cast on, knit, cast off, but she makes me want to pick up a pair of needles right now. Her question got me to thinking, though. Where did I learn to darn? I must have seen my maternal grandmother doing it, because somehow I knew you had to have an "egg" to do it (for years, I kept a silver L'eggs pantyhose egg for my darning egg). But I don't remember her ever really showing me what to do. I think darning is one of those things I more or less figured out on my own.
 My grandmother did teach me the art of embroidery. She used to embroider pillowcases, and I still have a pair she made for me. When I was about five or six, she sat down with me and some embroidery floss. She taught me to cut off a length, how to separate out two strands from the six; how to wet the ends in my mouth and then pull them between pursed lips to stiffen and flatten them so they would go through the eye of the needle. Then to cross the end over a wrap around my finger and roll it off and slide it down so I had a small knot with no tail hanging out.
 Then she gave me an embroidery hoop and a printed cross-stitch dresser scarf, helped me get the hoop in place with the material stretched taut, and set me to work. I'd played with sewing cards - pictures on rigid cardboard outlined with punched holes that a child could thread a shoestring up and down through, so I knew the general idea of sewing. Now I was going to learn how to do it with a sharp needle!
 I worked diligently on that red flower, and ran to show Grammaw when I reached the end of the thread. She admired my little x's, all lined up so nicely, and then turned the material over. I had a big clump of knots and tangles there, but I had just pulled things tight and kept sewing. Not good. She said, "the back has to look as good as the front," and then I couldn't believe it - she took her scissors and clipped my threads and sent me back to pick out all those stitches!
 I eventually finished it to her satisfaction, and then she had me hem it with a running stitch. To this day, I feel too guilty to run a length of thread across a gap instead of fastening off and restarting. I've found embroidery to be a wonderful pastime over the years - from my hippie days of decorating my denim, to playing with counted cross-stitch patterns, making up my own designs, and using the iron-on transfers I've found in garage sales and thrift stores. It's like painting with thread. I love using my collection of pillowcases and kitchen towels. Just seeing them makes me happy (and the backs look as good as the fronts). Thank you, Elizabeth Krukow Marks - Lizzie to most, Grammaw to me.
Labels:
family,
playing with needles,
thrifty arts
Thursday, March 13, 2008
Oh, Darn! Darning Socks
I went to put on my socks, and noticed a small hole in the toe of one. The saying, "a stitch in time saves nine" is so very true when it comes to mending socks. A small hole is easy to fix, but once it gets bigger than a thumbnail, almost impossible. To mend a sock, you wouldn't want to just sew it, because that would leave a ridge that could later cause a blister or sore spot. Mending a sock uses a method called darning, weaving a patch over the hole. So I went to get my darning kit.
 I inherited my mother-in-law's darning kit. She kept it in a marbled bakelite box. The box has a broken hinge, but it's the perfect size and I really love it. Looking at some of the things in there, I might be the third or even fourth generation to use it. There are big cardboard spools of cotton darning thread in normal sock colors, and smaller ones with some very bright and odd colors. Some of the threads are on wooden spools, and others are wrapped around rolled paper, labeled 10 yards for 5¢. There's writing inside the rolls, but I haven't wanted to take the thread off to see what it says. An assortment of wool yarns and nylon thread are wrapped around cards, 30 yards for 10¢. The darning "egg" is a wooden oval mounted on a spindle, the varnish worn away on the end and the tip scarred with gouges and scrapes. I've added a plastic cigar case, perfect for mending holes in the fingers of gloves, and a better pair of scissors.
To darn, put your "egg" inside at the location of the hole. For a darning egg, you want something rounded you can stretch the material over, with a smooth surface the tip of the needle will glide over. A light bulb or plastic Easter egg are good options. Thread your needle with yarn, darning thread, or embroidery floss that matches the type (and color, if you want) of material you're working with - wool yarn for wool socks, cotton floss for cotton socks. Double the thread for heavier material - you want to match the weight of the material too.
 Stretch the material slightly over your egg. Start below the hole where the material is in good shape. You don't want to knot the thread - that would create a lump - so anchor your thread by making a running stitch (dipping the needle in and out of the material) to 1/2 inch away from the hole, and then making another running stitch back towards the hole. Don't pull the thread tight enough to pucker the material. You want it to just lie smoothly in the slightly stretched material.
Make a boundary around, outside the hole, with running stitches. That helps anchor the darning and reinforces the edges. Then, working back and forth over the hole from top to bottom, lay down parallel lines of thread. When the hole is covered over, start parallel lines side to side, perpendicular to the first set, dipping the needle up and down to create a woven pattern that fills in the hole. Finish with a running stitch away from the hole, and one more back, trim the ends, and you're done!
Edit added later, in response to Linda's question: "Where can I buy darning cotton?" I haven't tried to buy darning cotton for quite some time - I inherited a lot of it, and can usually find a color somewhat close to what I need. But I often use embroidery floss. DMC makes cotton embroidery floss, available in lots of colors. I don't knit, but I think sock-weight yarn is available in cotton, wool, and acrylic versions - try to match what the socks are made of. Try your local fabric store: Joanne's, Hancocks, whatever is nearby where you live, the yarn section at Michaels, or even the crafts section at Target. You should be able to find something suitable even if it's not specifically labeled darning cotton. Incandescent light bulbs, soup ladles, and plastic Easter eggs make good darning eggs.
 I inherited my mother-in-law's darning kit. She kept it in a marbled bakelite box. The box has a broken hinge, but it's the perfect size and I really love it. Looking at some of the things in there, I might be the third or even fourth generation to use it. There are big cardboard spools of cotton darning thread in normal sock colors, and smaller ones with some very bright and odd colors. Some of the threads are on wooden spools, and others are wrapped around rolled paper, labeled 10 yards for 5¢. There's writing inside the rolls, but I haven't wanted to take the thread off to see what it says. An assortment of wool yarns and nylon thread are wrapped around cards, 30 yards for 10¢. The darning "egg" is a wooden oval mounted on a spindle, the varnish worn away on the end and the tip scarred with gouges and scrapes. I've added a plastic cigar case, perfect for mending holes in the fingers of gloves, and a better pair of scissors.
To darn, put your "egg" inside at the location of the hole. For a darning egg, you want something rounded you can stretch the material over, with a smooth surface the tip of the needle will glide over. A light bulb or plastic Easter egg are good options. Thread your needle with yarn, darning thread, or embroidery floss that matches the type (and color, if you want) of material you're working with - wool yarn for wool socks, cotton floss for cotton socks. Double the thread for heavier material - you want to match the weight of the material too.
 Stretch the material slightly over your egg. Start below the hole where the material is in good shape. You don't want to knot the thread - that would create a lump - so anchor your thread by making a running stitch (dipping the needle in and out of the material) to 1/2 inch away from the hole, and then making another running stitch back towards the hole. Don't pull the thread tight enough to pucker the material. You want it to just lie smoothly in the slightly stretched material.
Make a boundary around, outside the hole, with running stitches. That helps anchor the darning and reinforces the edges. Then, working back and forth over the hole from top to bottom, lay down parallel lines of thread. When the hole is covered over, start parallel lines side to side, perpendicular to the first set, dipping the needle up and down to create a woven pattern that fills in the hole. Finish with a running stitch away from the hole, and one more back, trim the ends, and you're done!
Edit added later, in response to Linda's question: "Where can I buy darning cotton?" I haven't tried to buy darning cotton for quite some time - I inherited a lot of it, and can usually find a color somewhat close to what I need. But I often use embroidery floss. DMC makes cotton embroidery floss, available in lots of colors. I don't knit, but I think sock-weight yarn is available in cotton, wool, and acrylic versions - try to match what the socks are made of. Try your local fabric store: Joanne's, Hancocks, whatever is nearby where you live, the yarn section at Michaels, or even the crafts section at Target. You should be able to find something suitable even if it's not specifically labeled darning cotton. Incandescent light bulbs, soup ladles, and plastic Easter eggs make good darning eggs.
Labels:
playing with needles,
thrifty arts
Subscribe to:
Posts (Atom)


